
Thank you for your purchase of your new D&J Precision Machine Engine. We have created this break in procedure to ensure optimum performance of you new engine. Every engine comes pre-lubed with 12 quarts of VR1 20W-50 race oil and a filter. We have found this oil works very well with break in.Your engine has been pressured checked for oil and crankcase leaks. It is also been pressure checked for coolant leaks. Your engine is ready to start putting on your accessories, wiring harness, turbo, and fuel system. There are a few steps we recommend for proper break in.
Step 1: Install engine in truck. Only hook up fuel system, transmision, turbo with oil supply and return, all electrical plug-ins to run engine. Install radiator and intercooler piping. Do not fill radiator at this time. Install a external mechanical oil pressure gauge crank the engine with the injectors unplugged, and fuel supply pump off (this helps not to not build rail pressure and add more load to the starter) until you start to get oil pressure. Be careful not to overheat your starter it may take a few minutes to get oil pressure. Plug everything in and clear codes.
Step 2: Start the engine with no coolant in it. After the engine is running and reading good oil pressure you are going to increase engine RPM to 1,800 rpm and hold it steady for five minutes. Try not to let engine idle more than necessary. We have found it causes piston rings to glaze and hinders camshaft break in. There will be a little oil residue coming from the exhaust side of the turbo or smoke out the tailpipe depending if your downpipe is hooked up. This is normal. The oil that is used in assembly is burning off or working its way out of the combustion chamber. It is a good idea to have a friend watch for leaks.
Step 3: After the five minutes run time is complete you can shut off the engine and check for any leaks. This is a good time to make sure all fuel lines are tight and look for any issue with turbo oil lines. If everything looks good let the engine cool, and fill engine with coolant. We recommend leaving the heater core hose off the top of the cylinder head as you are filling the radiator with coolant. This allows air to escape the engine as you are filling it. This also allows the cylinder head to be completely filled with coolant and not have any air trapped in the coolant passages. As you are filling the radiator watch the fitting for coolant. When the coolant starts to come out of the fitting, install hose, tighten clamp. Finish filling radiator.
Step 4: After the engine is filled with coolant, a 20 minute run at 1,800 rpm can be done. Once again do not let engine idle for excessive amount of time. This helps in bringing the engine up to temperature. We recommend stopping every five to ten minutes and checking for leaks or other issues if you are working by yourself. The engine can be left running during these checks. After the 20 minute run, shut off engine.
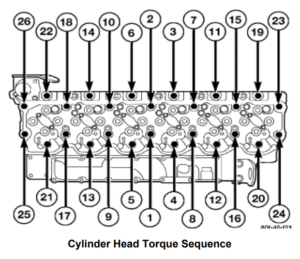
Step 5: Drain oil and change filter. A hot re-torque can be done at this time. Remove valve cover, injector wiring harness and rocker box. Intake rockers will also need to be removed at this time to re-torque head studs. We recommend removing intake rockers on the stud being tightened then replaced after torquing to help with checking valve lash in the next step. D&J 9/16” head studs are re-torqued to 175 ft. lbs starting in the center of the engine and working out towards the ends alternating from side to side. If your engine has been built with a different stud use there torque spec. After re-torque intake rockers can be torqued to 26ft/lbs.
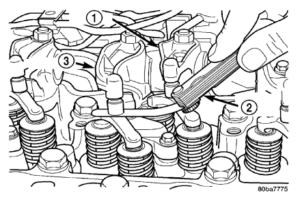
Step 6: We also recommend rechecking valve lash at this time. Valve lash needs to be checked at top dead center on number one or number six cylinder. Bring top dead center mark on harmonic balancer to 12:00 o’clock position. If both number one cylinder rocker levers are loose, continue to next step. If both number one cylinder rocker levers are not loose, rotate crankshaft 360 degrees.
With the engine in this position, valve lash can be measured at the following rocker arms: INTAKE 1-2-4 / EXHAUST 1-3-5 . Measure the valve lash by inserting a feeler gauge between the rocker arm socket and crosshead. Valve lash should be .010” on intake and .020” on exhaust. If the measurement falls within the limits, adjustment/resetting is not necessary. If measurement finds the lash outside of the limits, adjustment/resetting is required. If adjustment/resetting is required, loosen the lock nut on rocker arms and turn the adjusting screw until the desired lash is obtained. Tighten the lock nut to 24 Nm (18 ft. lbs.) and re-check the valve lash. Using the crankshaft barring tool, rotate the crankshaft one revolution (360°) to align the damper TDC mark to the 12 o’clock position. With the engine in this position, valve lash can be measured at the remaining rocker arms: INTAKE 3-5-6 / EXHAUST 2-4-6 . Use the same method as above for determining whether adjustment is necessary, and adjust those that are found to be outside of the limits. If everything checks out you can reinstall rocker box, injector harness, and valve cover.
Step 7: Re-fill engine with oil. We recommend using Amsoil 15W-50 full synthetic, or Hot Shot Secret Black Diamond Outlaw full synthetic 15w-40. We have seen good results with these oils. We recommend changing your oil based on usage and horsepower. The more horsepower means more frequent oil change intervals. We have seen oil quality can affect the amount of blow-by an engine can have and ring retention. Always check engine oil for level and also for how clean the oil is. If the oil stains your skin black then it is overdue to be changed. This means the oil is full of soot from combustion and is not going to be as effective in lubricating or cleaning.
These seven steps should insure a proper break in procedure for your new engine. If you have any further questions, don’t hesitate to call. We will be happy to answer any questions you might have. Thank you for your purchase.